


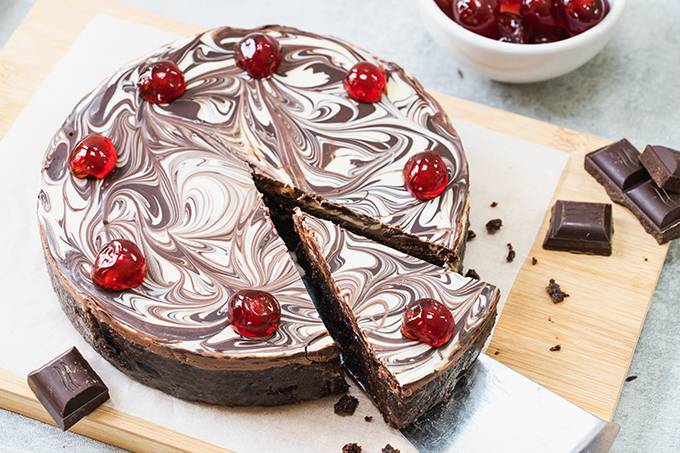
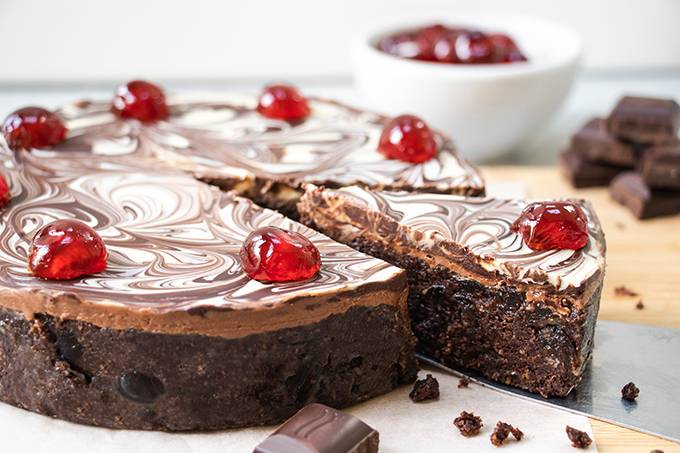
Chocolate biscuit cake is the easiest of indulgent treats to whip up, and will have people thinking you spent far more time making it than in reality! There’s a buttery, chocolatey, fruit-studded biscuit bottom with a thick marbled chocolate layer on the top. You’d also never guess that this simple recipe is gluten-free.
Making the chocolate biscuit cake
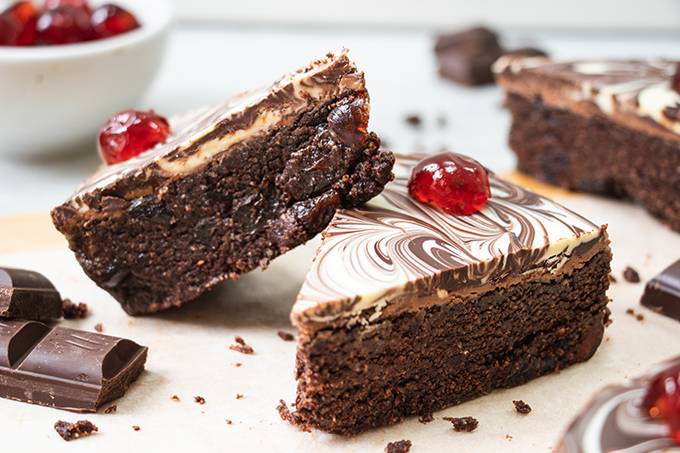
It’s a simple case of crushing up gluten-free biscuits, before melting butter, golden syrup and cocoa powder in a saucepan. Along with some glacé cherries and raisins, everything is mixed together and squished into a lined cake tin to form the rich biscuity base.
Creating the marbled chocolate top
Once the biscuit layer has been created, lashings of melted chocolate are poured on top. To get the marbled effect, I used a mixture of milk, white and dark.
- In the microwave in 30 second bursts, melt each type of chocolate in a separate bowl.
- Pour the milk chocolate on first and smooth out to create an even layer that completely covers the biscuit.
- Next, add random alternating spoonfuls of dark and white chocolate all over the milk chocolate. Using the white and dark as the top layer will give you the most contrast to really make the marbled effect stand out.
- Using a skewer or cocktail stick, make random swirling motions through the chocolate. And ta da! You should have a super fancy-looking chocolate marble top. All that’s left to do is pop it in the fridge to set.
If you give this cherry and chocolate biscuit cake a go, I’d love to know how you got on! Leave us a comment and rating below, or tag us in photos of your creations on Instagram @BlueSkyEating. Enjoy! 🙂

Cherry & Chocolate Biscuit Cake (Gluten-Free)
Ingredients
- 300 g gluten-free digestive biscuits
- 140 g unsalted butter
- 125 g golden syrup
- 40 g cocoa powder
- 100 g raisins
- 100 g glacé cherries (chopped into quarters)
- 225 g chocolate – certified gluten-free if necessary (I used a mixture of milk, white and dark chocolate, 75g of each, to create a marbled topping but you can use whichever chocolate you prefer)
- Extra glacé cherries (optional, for decoration)
Instructions
- Grease and line a 7" round cake tin.
- Crush the digestive biscuits into fine crumbs using a food processor, or by putting them in a plastic bag and bashing with a rolling pin.
- Add the butter, golden syrup and cocoa powder to a saucepan.
- Melt everything together slowly over a very low heat, stirring frequently.
- Once the butter has melted and everything is well mixed, stir in the raisins and cherries.
- Take the pan off the heat and stir in the crushed biscuits, mixing thoroughly.
- Transfer the mixture into your lined tin and push it down firmly with the back of a spoon to create a level bottom layer.
- Melt your chocolate (in 30 second bursts in the microwave to prevent burning). If creating the marbled topping with milk, white and dark, melt these in three separate bowls.
- Pour the milk chocolate over the biscuit layer and smooth this out evenly to fully cover biscuit. Next, use a spoon to place random, alternating dollops of white and dark chocolate all over the top of the milk chocolate layer. Then use a skewer or cocktail stick to make swirling motions through the chocolate, creating a marbled effect.
- Place the tin in the fridge for 2 hours.
- Once set, the chocolate biscuit cake can be kept at room temperature. Slice, top with extra glacé cherries if desired, and enjoy! This can be stored in an air tight container for up to a week.
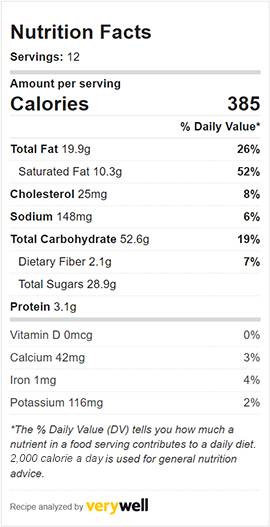
Please note that nutritional information is based on estimated quantities and therefore not always 100% accurate.

Leave a Reply